Gain Staging

In this blog post i’m going to be talking about gain staging. Gain is volume that has been added to 0db. Having appropriate gain staging during a recording session is very vital to make sure all of the levels are correct and not too loud, quiet or distorted. Turning down gain during a recording will often lead to unwanted “noise” appearing. “Noise” is the name given to unwanted frequencies/sounds. Turning up the gain will often end with the signal peaking and causing distortion of the recorded sound. The signal should be set so it is roughly in the middle of these two things, high enough so there isn’t noticeable noise in the sound and it should also be low enough so it doesn’t peak and distort the sound. The best way to achieve the correct balance is sound checking the instrument in question to discover what gain works best, based on the players style and ability.

Gain staging, although a beginning antic in the studio, happens regularly throughout the recording session. All volume levels from any input need to be considered. For example, if you were recording an electric keyboard, the volume fader on the keyboard itself has to be set at a level that is workable within the gain staging. Again, if the keyboard is too loud it can cause distortion, too quiet and it can let unwanted noise through. This would also occur when an amp is miced up. Another example which is a bit less controllable would be recording drums. Every kit on each drum is always going to differ in volume. This is why in sound checks, it is often asked if the player can play as loud as they possibly can to ensure that it won’t peak at any cost. Gain staging drums is slightly more time consuming but can be pulled off easily if you go about it the correct way. It is vital that you understand that all gain staging happens through various parts of the recording process and is not just done through the mixing desk. All objects involved that can produce volume of its all have to be considered. The input type will also have to change depending on how you are routing a certain instrument. If you are recording an instrument through a microphone, the input will have to be set to mic input and depending on the mic itself, phantom power may have to be switched on too. DI’d inputs will have to be switched to line input in order for the signal to come through.

In my opinion, gain staging is subjective and people can play around with it how the please to get the desired sound they want. For instance, before distortion was a common sound for instruments, guitarist and other players used to turn up the volume to the point where distortion would occur through the speakers, to get the desired sound. This can be the same with gain staging.

Risk Assessment of Studio Time

I’m going to do a short risk assessment of a recording session we did where we as a group were given the challenge of recording two improvised tracks with only two microphones, with each song using different microphones. I’m going to be looking at what could go wrong whilst operating and recording in the studio. This will apply to the session we did and recording sessions in general.

ELECTROCUTION

In recording studios, electric is obvious a key ingredient to make everything function and allow people to record music and operate the studio in general. Problems could arise if connections are faulty or wattage is donated to certain objects in too big of a quantity. Dodgy wires can fray and cause electrocution when touched. This can cause serious injury and even death depending on the wattage and how severe the electrocution is. It’s highly important that electrics are maintained properly in the studio seeing as electric is the main ingredient to make it all work. Things as simple as wrapping frayed wires in electric tape can stall the problem until the wire can be replaced. Faulty microphones can also cause electrocution, especially vocal mics. There has been occasions where I’ve attended a studio session and the vocalist has had small electric shocks off of the vocal mic. Microphone electrocution can be very severe depending on the situation. I once went to a gig where the vocal mic was dodgy and the vocalist took a sip of water before returning to the mic. The shock he received was so bad that he passed out instantly and had to be taken to hospital. It’s easily avoidable with the correct pre-cautions.

CUTS/BRUISES/GRAZES

This can be a minor issue most of the time, especially as there isn’t a lot of things you can severally cut yourself on in a recording studio. Different types of cuts/bruises/grazes can occur in the studio and aren’t uncommon. In a recent studio session I did, my drumstick had splintered mid song and cut my left ring finger rather badly. This caused me to start bleeding mid take. It wasn’t severe by any means but it did hurt and I got blood over my jeans, snare, arm and drumsticks. A lot of the time the simplest solution to this is to clean the wound and plaster it up. In more severe cases where the bleeding is heavy, pressure should be applied to the wound until in stops and then it should be dressed correctly to avoid further cuts and infection. Bruises rarely occur but aren’t totally unheard of. I’ve given myself bruises in studio sessions for catching my arm on the rims of drums. Bruises can’t really be treated in any way instantly as the develop over short periods of time. Grazes are also rather uncommon but can happen. I haven’t personally experienced this but they would be treated in the same way as cuts.

TRIP HAZARDS

Trip hazards are very common in the studio. For the majority of the time there are various wires and equipment strewn all over the place. The most common thing to trip on in my opinion would be wires. They’re hard to see in some instances and can blend into the carpet. The are very easy to trip on and can cause serious injury depending on where the person would fall and if they would hit anything on the way down. Trip hazards should be discussed before starting studio time so that everyone is more aware of what is about. A practice to avoid these situations could also be to buy brightly coloured wires, or wrapping the wires with brightly coloured tape. As far as tripping over gear goes, all gear that is being unused should be packed away and out of the way, either in a storage cupboard or just packed away in a corner of the room. Trip hazards can end fatally, but are also easily avoidable if the right precautions are taken.

LIFTING

Lifting objects is always going to be a hazard in any given situation as it can causes back problems, items being dropped on feet and much more. Within the studio, there can be a mix of really heavy objects. Some examples would be PA speakers, cymbal hardware cases (which have hardware in), cab speakers and so on. Knowing how to lift objects properly would be a good start to avoid injury, simply teaching someone how to do so before you start work in the studio could avoid a crippling injury. If any object is too heavy to be lifted alone, it should either be left or lifted with another person. If heavy objects are dropped on feet, this can cause bone breakage which would result in being hospitalised, which is why it is important to be as safe as possible.

OBJECTS FALLING

Although rather unlikely, sometimes in the studio, equipment is suspended in the air. An example of this would be where at the college studios, there are PA speakers suspended in the airs which are on wall brackets. If an object of this weight were to fall on someone it could cause severe injury, especially if it hits someones head. An easy way to ensure this doesn’t happen is simply by doing regular checks of the suspended objects to make sure they are securely fastened to whatever it is holding them in place.

FIRES

Fires can occur in the studio. Especially electrical fires from things overheating after prolonged used. There should be an electrical fire extinguisher to hand if this were to occur. There should also be an arranged fire safety meet point to ensure you can check everyone from the building has made a speedy and safe exit. The most common reaction to a studio fire would be to alert everyone in the studio, make a speedy exit and call the fire brigade. If the fire is manageable, a CO2 fire extinguisher should be used to tame it. Frequent checks of the most prone electrical objects should be carried out regularly and flammable objects should be kept well away.

Here’s a brief risk assessment table i’ve put together to summarise.

Screen Shot 2016-05-18 at 17.55.27

Dogs Dinner & I Won’t Feel The Benefit

Me, George and Harvey were given the task of recording some improvised tracks by only using two mics of our choice. We decided to do two tracks, one track with Rode NTA1s and the other with Rode M3s.

You Won’t Feel The Benefit

The first track we did was called “You Won’t Feel The Benefit”. This was completely improvised and lasted approximately seven minutes. This track was recorded with two Rode NTA1s set up in certain places in the room. George drew diagrams of the setups which I will attach below. The first one is for this track.

ywftb

As you can see, the Rode mics were setup so one was facing me on the drum kit and the other one was set up to roughly face in between the bass amp and guitar amp. This was to try and gain an equal level from both amps. The guitar should’ve maybe been louder, or better yet, we should’ve angled the mic more towards the bass amp. The drum sound was surprisingly good for one mic. My only quarrel is that the drums weren’t tuned very well to start with and I didn’t possess a drum key to alter them in any way, so I had to make do. I used an o-ring on the snare to cut away some overtones a bit, as it was very ringy and was tuned very highly. The cymbals also seem to sound rather lack luster in this mix. Other than that, I think the mics and the placements worked very well for an improvised jam.

Dog’s Dinner

Dog’s dinner was the second improvised jam we recorded, but this time we tried different condenser mics. We used the Rode M3s for this recording and set them up like they are in the diagram below

. ddiner

This track  lasted approximately fourteen minutes. We faced the one M3 more towards the guitar amp in this take. The M3 mics tend to capture a more closed off sound compared to the NTA1s, this meant the room sound would sound different and the mics wouldn’t necessarily pick up as much a the NTA1s did. Seeing as in the last take with the different mics, the bass was the most dominant, we switched it around a bit and made sure that the guitar would be sounding a lot more present. It turned out that the mix of the guitar and bass was actually a lot better this time around. We then kept the same method as last time and faced the other M3 toward the drum kit in a way that it would pick up mostly everything. Although, I think the drums sounded a lot worse on this take. It wasn’t clear,  it sounded very clangy and messy in my opinion. Overall, the M3 shined a lot more for the guitar and bass sounds, but failed a lot more when it came to getting a decent drum sound.

If I were to redo this project without the mic limitations, I would mic the room up with the following:

  • Guitar & Bass – Rode M3 facing from approx half a metre away
  • Drum Overhead – Rode NTA1 to capture the majority of the kit and give a clearer sound
  • Snare – Shure SM57 for the top of the snare so it can be mixed and EQ’d to my preference
  • Bass Drum – AKG D112 inside the bass drum porthole so it can be mixed and EQ’d to my preference
  • Room Mic 1 – Rode M3 in the corner roughly a metre off of the ground facing the middle of the room to capture any narrowed out frequencies that are travelling around the room
  • Room Mic 2 – Rode NTA1 in the other corner approximately two metres off of the ground to capture a decent room sound and to also capture any escaping frequencies travelling upwards

I’d also make sure the kit was tuned significantly better, as the kit I played on was tuned horribly, everything was tightened to the extreme and none of the lugs were matching the same frequencies. As well as breaking the drum hoops and tension rods, this gives an awful sound and if left for too long can seriously damage the drums. Overall, I really enjoyed this project and I’m quite eager to try something similar with a bit more freedom again.

As a unit, I believe me, Harvey, George, Martin and Chris worked well as a team for this project. The communication was clear and everything was talked out rather than screamed over. We all took in each others different ideas and opinions and tried them all accordingly. We got everything done swiftly and all the gear was set up and packed down correctly and safely. If I were to do this again with the same set of people, I think i’d personally make more points on my own opinions, as I kept quiet for the majority of it and let the others make the main decisions and I pitched in on occasion if I whole heartedly didn’t agree with something. But in the end it all turned out very well and we worked well to get a finished product out of it.

Ban The Skacode

Me and my band mate Benji recorded a demo for a ska song we wrote. We both did our own seperate mixes of the recorded demo, here’s mine:

Ban The Skacode

The guitars and bass on this track were the only real instruments used on this track. Everything else is a software instrument. We DI’d the guitars and bass and then added effects to them afterwards to suit what sound we were going for. We DI’d because in the past with demos we’ve had problems with micing up the amps we were using. The problems arose when we had room sound and when we couldn’t edit the effects afterwards. We have had instances where because we record in the one room, you can hear people moving around and in some circumstances people coughing. Also, once the guitar had been recorded, sometimes we didn’t like the effect after it had come through the mic. So we figured it would have been best if we DI’d so we could alter any effects and avoid room noise at the same time. The horn section is comprised of trombone and trumpet. These admittedly sound a bit naff, but we don’t possess any sample packs which have decent horn sections. All of the guitars and bass were done in one take, hence the messyness of timing and such. It’s not so noticeable a lot of the time, but roughly halfway you can hear the bass slip out of time really obviously.


My Strengths & Weaknesses

In this blog post I’m going to be discussing my strengths and weaknesses as a player, especially in improvisation. I started drumming in October 2012 as part of a development scheme called ‘Worcester School of Rock and Performance’ with my friend, Harvey (who I still study music with today). We had individual instrument lessons and then we chose other band members and learnt approximately 4/5 cover songs to play for an end of term show, which was at Bishop Perowne High School. Here’s a video one of my friends shot of our cover of “Fiction” by Avenged Sevenfold.

Fiction Cover – Avenged Sevenfold

This was my first performance as a drummer and I had only been playing drums for around 2 and a half weeks. I have VERY poor technique at this stage, all of the strikes on the kit are coming solely from arm movement, without implementing the use of my wrists at all. Even though the video is very poor quality you can make out how stiff I am. At this stage in the game I had no idea what improvisation in music was and how to execute it in any shape or form. The whole of the track played in this video was practiced solidly for those few weeks and was played exactly the same every time. Every fill and drum beat was copied as close as I could follow to the original. Also note that the drummer for Avenged Sevenfold at this point was great and had a few little tricky licks in this song which I wasn’t capable of playing just yet. I didn’t know how to improvise at that moment in time, but it all starts to come to me later.

A few months after this video I had enrolled and started studying a Level 3 Extended Diploma in Music Performance at Kidderminster College. Our first show (similar to my first ever show on drums) involved performing cover versions. If I remember rightly, I was ill the day the songs for the show were picked and I ended up being put on a pop-punk track with three other people I’d never met before. Here’s a video of one of the rehearsals we had on the lead up to the gig.

The Hell Song Cover – Sum-41

Again, I’ve still got the awful technique. I’d say the only overall improvement on this track to the first is that i’m more comfortable on the drum set. But overall, I’m still a very basic beginner at this stage.

The term after this show, we began to work on the jazz show with improvisation. I really struggled to start with as I didn’t have the basic knowledge of how to just let loose around the kit and just play whatever fit. The piece we had to all take solos in was a 12 bar blues just to get us comfortable with improvising. I also didn’t understand the concept of swing at this point and was trying to count 12/8 as if it were straight rather than a swung 4/4 feeling. I remember feeling quite mad at myself for not being able to do this. But it all came down to the fact that i’d only been playing drums for a few months and had no back catalogue of riffs and sticking patterns to help pull a solo together. After a lot of frustration and anger, I managed to pull myself through the piece and gain the lowest mark for that particular unit.

After gigging intensively over the past three years, I now find myself in a situation where improvisation comes to me relatively easy and I can throw together different stickings and licks i’ve learnt over time. Here is a video of me recently playing with my band.

You Know The Drill – No Ambition Live

I’m also singing some main vocal parts in this live video which I found difficult to begin with, but have learnt to cope with as time went on.

Weaknesses

  1. Theory: Even though I have been studying music over the past four years, I find that music theory takes a while to sink in with me. When I get something right, it will stay with me, but getting it right in the first place seems tricky for me. I strive more in rhythm based theory as I am a drummer, it’s melodic and harmonic theory that gets to me. Definitely something I feel weak in, but feel I could definitely improve on.
  2. Dexterity: I started in a functions band and now I am in a gigging pop punk band. Because of this, I feel very safe in my boundaries as I know drumming makes the songs fit the genre. I feel that I fall victim to this slightly as when i’m playing something besides pop-punk, the drum habits start to spill over a bit, mainly with fills. This isn’t a solely bad trait by any means, but I feel that some variation could be nice so I could switch up when needed.
  3. Sightreading: I can sightread, but I think it could be a whole lot stronger. If I sit in front of a piece of music, I can read through it in given time. But I can’t sit and play it straight away just by mulling it over for a few seconds. I’d love to be able to sit in front of a piece and just be able to start playing through it. This is a hard trait to gain, but I’d love to be at that level at some point down the line.
  4. Tempo: I’d like to say that I’m a solid drummer. But I know I have the tendency to speed up tracks when I’m not playing with a click track through my in ear monitors. I think this comes down to nerves and I would like to stop this from happening too drastically.


Strengths

  1. Technique: When I started studying drumming I had awful technique. Awful to the point where it would hurt to play for longer than twenty minutes at a time. Andy Edwards, my tutor, taught me how to use Moeller Technique while drumming, so that I could still play with force, but be able to stay relaxed and un-tensed. I’ve found that my speed has greatly improved since employing Moeller Technique and I feel that it has made me a much better player. Technique is something I now pride myself on.
  2. Speed: I think I am pretty fast around the kit, I do need to work on my foot speed. But with my hands I’d like to think i’m fast. Not a great trait to pride yourself on, but it’s nice to be able to pull out speedy licks when necessary.
  3. Vocals: I can sing and play drums at the same time. I can also do fills whilst singing too. I found this very hard to begin with but now I pride myself on this ability.
  4. Sound: As a drummer, I think I sound good. I can get a good sound out of a poorly tuned kit most times, and I have decent gear for my outside of college gigs which can make me sound epic. I’d like to work on my drum tuning personally. But overall I think it’s pretty good.


The Long Awaited Blog for The Recording of “Highwire”

In this blog, I’m going to be talking about a track that me, Will Allman and Lewis Spencer wrote back a few years and eventually recorded. I just wanted to upload a blog to explain what went on in that session and how we went about it.

For this recording assignment, we had to record a selected song without help from any tutors, and keep a log of what happened along the way.

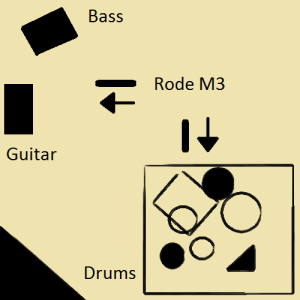
It is an entirely instrumental piece. The song is meant to symbolise being trapped and trying to escape. We came to the decision that the drums should be recorded first, and we should mic the kit in this way: 2 overhead mics (Rode NTA1 Condensers), 1 snare drum mic (SM57) and 1 bass drum mic (AKG D112). These mics were decided on because we thought they’d be the best quality. The two Rode Condenser mics because they pick up a large amount of frequencies, meaning it would pick up the whole kit in one. The SM57 mic is good at picking mid to high frequency sounds which means it is good for a snare drum as it would pick up the high frequency pop sound a snare makes and finally the AKG D112 is a bass mic, therefore it picks up low frequencies and so it would be perfect for use on a bass drum. The AKG was linked to channel 1, the SM57 to channel 2, and the Rode Condensers to channels 3 & 4. I then quickly soundchecked the kit to make sure everything was coming through, which it was. But there was a slight odd problem in that even though the bass drum mic was linked to channel 1, it was coming through channel 2. But then we quickly discovered that the leads in the back of the mixing desk were mixed around, channel 1 was plugged into 2 and vice versa. After sorting that problem we decided to go for a take, Lewis and Will came into the recording booth and played along with me unplugged so that I could keep the timing right, as some parts are funnily timed. I messed up about half way through the song on my first take, so I had another go. The 2nd time round seemed fine, until I went back round to the studio to find that channel 4 wasn’t rooted, so Overhead Mic Right didn’t record anything. So once again after sorting the problem we went back into the live room and tried a 3rd take, which went all to plan without any problems. We then turned all of the levels down and proceeded to pack away for the day as our 2 hour studio time had come to an end. Before leaving the studio, I quickly normalized all of the tracks, and saved the file.

On our second studio session we tried to kill two birds with one stone and record the bass and guitar at the same time. We decided to record the bass through DI (Direct Input) as we didn’t want any effects on the bass at this time, and we could EQ it further into the project. We used the SM57 mic again to record the guitar amps as it has mid to high sensitivity which would make it ideal for a guitar amp. We then had to go about sending my drum tracks through to Will & Lewis in the recording booth, but we had a slight problem where we could only locate 1 set of headphones. So we decided to give Will the one set of headphones, and send the drum tracks to both the speakers in the recording booth and the headphones that Will would be using, so then they could both hear, and play along to the track. This was then followed by another error which we had to sort out, the signal that was coming through the speaker was very quiet meaning that Lewis couldn’t hear what was going on, so after they had a trial run through to see how it went, Lewis said that he couldn’t hear anything, so we went about trying to figure out how to make the signal louder. After about five minutes of brain storming we figured out how to do it, meaning that Lewis could now hear the drums he’d be playing along to. They then took another take in which Lewis messed up, resulting in a third take where everything went smoothly. We then packed away all of the mics, normalized the tracks which had just been recorded, and saved the file for the next session.

At the next studio session we began by listening to the track, also at this point, Lewis felt unimpressed with his guitar take from the last session and requested that we re-do it. We set up for Lewis to re-record his parts the same way we had previously. All went well and he managed to nail his parts in one take. We then simple tidied the mics away. Now came the part of the process where we alter the product in any way we please. We deleted all of the unwanted takes and then got to work on detail. Such as compression, effects, editing etc. We decided that the drums would be an ideal place to begin with, and started with noise gating the kick drum. We did this by going to the inserts section whilst having the kick drum layer selected, and chose ‘Gate’. From this point on Will took charge to gate the drums as we felt he had a better knowledge of how to get things sounding nice and smooth. We got a nice sounding kick drum, gated with the following settings: -26.9 Threshold, and 0.1 Attack. This gave a nice booming sound for the bass drum, with no spill from any other drum or cymbals. We then continued to gate the snare drum, as it had a lot of spill coming from the hi-hat cymbals. We managed to remove the cymbals, and get a nice popping sound from the snare, gating it with: -38.7 Threshold, 332 Release, and 0.1 Attack. We then followed it up by gating the overhead mics. Left mic was gated with: -53.1 Threshold, and 525 release. Right mic was gated with: -44.9 Threshold, and 302 release. This made the toms sound really clear and crisp, whilst making the cymbals louder and more effective. The project was then saved.

The week after we began work on the other instruments (bass and guitar) and also the harmony vocals. We didn’t need to put a noise gate on the bass as it went through DI which means there would be no other sound but the bass guitar itself. However, we did feel the need to add some compression to make it sound clearer. After being recommended some presets by some of the other students in the class, we made the decision to go with the preset “Percussion 2” as it made the bass louder, smoother and more bassy. We then continued on to do the same with the guitar compression and ended up choosing the “Light Jazz Vocals” preset as it made the guitar louder and cleaner. After the compression stage, Lewis informed us that most of the guitar is supposed to be distorted, but he recorded it in a clean setting. So we copied his guitar track onto another layer, and added distortion to the parts which he told us to. We did also decide decide to get Benji to drop some vocals over one section of the song in which he copies the lead line. We recorded this through a Rode NTA1 Condenser Mic in one take and put the Light Jazz Vocals preset on this too.

After all of this process was complete we listened back to the track to see how it sounded. Under close inspection we noticed that the bass was a 16th note behind everything else, but we didn’t have enough time to change it. We then saved the project, did an audio mixdown of the track and sent it to all of our email addresses.

If I could re-do the project, I would definitely do things a lot different, for instance I would figure out the tempo to the track and play along to a click to avoid any timing problems, and I would also request to record the guitars, vocals and bass individually, instead of trying to do it all in one go. On reflection, the outcome of this project was very poor in my opinion. The playing is sloppy, it sounds very poor and I don’t think anyone’s heart was in the project as by the end, nobody really seemed enthusiastic about it what so ever. I would completely re-do everything if we were to try and revive this track, although the thought of it is very unappealing.


Roles & Responsibilities of Planning and Producing a Work

To create a well functioning, good sounding piece of music, there is genuinely a lot involved with various different roles and responsibilities spanning over numerous different people. I’m going to go through and discuss all of the individual aspects of planning and producing a piece of music work from a studio perspective. I myself have had various different studio experiences and all of which have operated very differently from one another. I am going to record my band’s EP early next year at a studio in Wrexham. For creating a truly masterful piece in a recording studio, the roles and responsibilities have to be stuck to quite strictly to ensure the best end product.

  • THE MUSICIANS

Whilst in a studio to record a piece, they’re will be musicians involved, it can range from a number of people, whether it’s a single person recording all of the necessary parts, or five plus people recording each instrument. The musicians need to keep a level head whilst they are working in the studio as it can be stressful and can also often lead to paranoia whilst recording their parts. I call this “Studio Fever” as I tend to find that as soon as the record button is hit in the control room, I lose all ability to function as a drummer. This does tend to go quite quickly, but I sometimes find that the first few takes are very ropey. I am able to get over this feeling by keeping a level head and not overthinking/overcomplicating my drum parts. Musicians can also have the tendency to mess around quite a bit in the studio which can really aggravate other people that are involved in the recording process. Musicians should have the responsibility to act in a professional manner, know their parts, and to listen to outside opinions rather than being snobby and not loosening their screws in terms of ideas.

  • INSTRUMENT TECHS/ENGINEERS

Depending on the band, the musicians instrument techs may come along to set up the instruments and tune them necessarily to the song. For instance, a drum technician should have the ability to tune the drum kit to certain keys. My band plays mostly in D and I have the drum kit tuned to D all the time. The studio engineers can often do this too. The engineers job within the studio is to set up all necessary instruments or mics depending on whether the instrument techs are there to help and make sure that they are all set up correctly to ensure a great sound. Mic placement is extremely important as it can effect the overall sound in the final product. The engineer is also the person who operates the recording system through the computer. Essentially, without the engineer, a recorded product can fall apart, they have the knowledge and ability to be able to capture great sounds off of the instruments just from mic placement and choice alone. Without this knowledge, everything involved in a studio recording immediately becomes extremely difficult. Although instrument techs aren’t completely necessary for a studio recording, better sounds can be achieved with their know how.

  • PRODUCER

A producer that is involved within recording a product will be the person who oversees and manages the overall activity involved with the record. They will do things like suggesting changes to songs and structures. The producer will sometimes double up as the recording engineer as well as being the producer. In some cases the producer will be in charge of the budgets and contracts involved with the recording so they know how much they have to work with, in terms of studio booking, drum skins, strings and much more. Producers can also suggest rewrites to parts of certain songs if they feel that it cannot be manipulated in anyway to put it up to the correct standard. In most cases, the producer will also be the person who mixes the tracks or supervises it if it’s done by someone else.

  • ASSISTANT ENGINEER

In some cases depending on the size of the project, the main studio engineer will have an assistant engineer who will deal with the more mundane jobs such as plugging and routing all of the microphones, helping with the re-skinning of drums, general tidying and a few other things. Assistant engineers usually are there free of cost to gain the experience of being an engineer.

  • MAINTENANCE MAN

It may sound silly, but in a few studios i’ve dealt with in the past, they’ve had a maintenance man who would take care of the building in general and be the handyman in case anything goes wrong. An example of this would be that one of the pipes in the studio toilet had a crack and was leaking, so it was his job to repair. This may not be essential for a role regarding a piece of work, but without this man, toilet breaks could’ve become very…interesting.


You Know The Drill demo analysis

In this blog post, i’m going to be reviewing some demos that we recorded in my band, You Know The Drill. We have recently been at Steel City Studios in Sheffield recording an EP, but before we could do that, we demoed the songs for the pre-production stage. The ones i’m going to be talking about in this blog are the songs with placeholder titles, “Less Than You” and “Game Changer”.

Less Than You

The drums for the demos we did are all done by midi. We programmed in the parts I play for the tracks and ran it through a program called EZDrummer which is a very good sample pack. This program contains different drummer’s kits, bands such as While She Sleeps are included in this program. The guitars were then all tracked by Benji, the singer and rhythm guitarist. He played through DI and then effects were added once we had correct levels. We just used a simple distortion sound for both of the guitars in this track. The bass was then recorded by our bassist which was just ran through the DI with no effects. Benji did the mix of the songs once all of the parts were tracked and programmed, in my opinion the mix sounds pretty solid to me, especially for a demo. The drums in the blend sound like theres had some slight sample replacement on a real kit rather than all of it sounding 100% programmed. The guitar sounds are okay, but I think it should sound a bit more raw with maybe slight more gain. The bass is also okay, it’s ran through a DI and was mixed flat so it sounds pretty substandard to me. I think it wouldn’t hurt to have the bass higher in the mix too. For a demo I think it sounds great.

Game Changer

Drums in this demo were done the same as Less Than You, however, in this mix I think it sounds a lot more like a real kit. I think it’s the simplicity of the song which makes them sound better as the drum beats are solid and it’s all fairly simple. The same goes for the guitars and bass. This demo did turn out to be a bit of a disaster as a final demo as something strange happened to the song after the bounce down. There is a random gap at the end of the track to then  kick back into a chorus which shouldn’t be there at all. Also there is a random farty bass noise at 2:55. I’m not really too sure how Benji didn’t pick up on these two things before bouncing it down. Apart from these mistakes, I prefer the sound of this mix over Less Than You as it sounds a lot more clean cut to me. For a demo at least I think it sounds almost like a proper mix. If the drums were recorded properly and the mistakes were fixed, I think we’d be good to go.

Improvisation in Music – Giant Steps

In this blog post I’m going to be taking an in-depth look behind the jazz standard “Giant Steps” by John Coltrane and different approaches and methods to improvising through the form. It’s seen in the jazz world to be a challenging piece, especially when it comes to soloing and improvisation. The chart for Giant Steps is as seen below.Giant_steps

This piece is a strong example of a composition method John Coltrane used which was referred to as “The Coltrane Matrix”. The method itself was a way of suggesting all twelve keys at the same time. This would usually result in reharmonisation of ii-V-I chord progressions.

All said and done, when the song is stripped back enough, three major keys become the main basis. These are G Major, B Major and Eb Major. The most obvious way to play through the changes would be which the major scales through the key changes. If we look at the first section of the chart, we start in B Major starting on a BMaj7 chord, until it reaches the D7 which is where it modulates to G Major. A dominant substitution has taken place here, where  instead of there being a Dmin7 and staying in B Major, he’s altered the chord by sharpening the b3 in the chord, making it a dominant and therefore modulating to G Major, as D7 is the 5th of that key. The next change is then to a GMaj7 chord which is then followed by another modulation and chord substitution, changing it up into Eb Major. It goes to the 5th chord of Eb Major which is Bb7 followed by a EbMaj7 chord for an entire bar. Though I am explaining the key changes and chord substitutions, this track is hard to improvise through because of the speed its played at. We’ve already changed through three different keys and we are only at the beginning of the 4th bar. The BPM of this track is 286 in a fast swing style, so these bars pass in no time at all. Phrasing notes nicely at this speed becomes very difficult. At the beginning of the 4th bar we modulate back to G Major beginning with a Amin7 chord, there is then a ii-V-I chord progression in the same key ending with GMaj7, after which we modulate back into Eb Major with the Bb7 chord, shortly followed by EbMaj7, which is a V-ii chord change. The same method comes after these chords which allows us to modulate back to B Major by using the F#7 chord. A full bar of BMaj7 follows after this modulation which remains in B Major. The bar afterwards contains a minor ii-V-I in Eb Major, containing the chords Fmin7, Bb7 and EbMaj7. We are now back in Eb Major. Within the next four bars, we begin in Eb Major with a full bar of EbMaj7 followed by a ii-V-I in G Major, which is Amin7, D7 and GMaj7. This means we have modulated yet again back to G Major. Following this is another minor ii-V-I in B Major ending with a full bar of BMaj7. What follows is a minor ii-V-I in Eb Major containing Fmin7, Bb7 and Ebmaj7, before ending with a final ii-V in B Major containing C#min7 and F#7 to end. You can improvise through the chart start to finish by using the major scales for each time it modulates, although this would mean changing major scale thirteen times through each play through of the chart. Playing the major scales with all the changes and at the BPM of the track is very difficult and can often lead to the person improvising to sound very messy, or lose track of what they’re doing completely. Phrasing becomes particularly difficult because of the speed. A method that would probably feel more at home, would be playing through pentatonic scales rather than major scales. You can use the minor pentatonic to solo through the chart. I’ve quickly typed up a chart in which you can see all of the key modulations throughout the track, here it is pictured below:

FullSizeRender

From each of the major keys used in this chart, there are three pentatonics that can be executed. They’re minor pentatonics taken from the second, third and sixth parts of the keys. So if we were in G Major, you could use A Minor Pentatonic (Second), B Minor Pentatonic (Third), or E Minor Pentatonic (Sixth). The third and sixth pentatonics from each key will sound best using over chords that sound homely or resolve such as the I chord, maj7 chords and so on. Whereas the second pentatonic will work and sound better over dominant chords. In my personal opinion, I think playing pentatonics through the chart rather than just the standard major scales as they sound a lot more interesting. But using either of these scales can sound like a huge mess unless they are phrased nicely, especially at 286BPM.

A more advanced method of soloing through the chart is arpeggiating through the chord changes.  To be able to do this you need to know what the chords are built up of in order to arpeggiate through the chords properly and smoothly. Chords are built up of different intervals, each chord type having more or less than others. If we look at the chord types in this chart we can look at what they are built of:

Maj7 Chords are built with the intervals: 1 3 5 7

7 (Dominant) chords are built with the intervals: 1 3 5 b7

Min7 Chords are built with the intervals: 1 b3 5 7

So all the notes in the chords are:

Bmaj7 = B, Eb, F# and A#

D7 = D, F#, A and C

Gmaj7 = G, B, D and F#

Bb7 = Bb, D, F and Ab

Ebmaj7 = Eb, G, Bb and D

Amin7 = A, C, E and G

F#7 = F#, A#, C# and E

Fmin7 = F, Ab, C and Eb

C#min7 = C#, E, G# and B

Knowing all the notes in all the chords will allow the player to improvise and arpeggiated throughout the chords, although at the speed the chords pass in, it could prove difficult to phrase it in such a way that makes it sound nice. As a drummer myself, I find it particularly difficult to get my head around the theory side of improvising through extreme pieces like Giant Steps, but once the main portion of theory is down it’s easy to see how it can be accomplished. I think the main difficulty for players in this song is the sheer speed and complexity of the track. Phrasing becomes a very painful task and can make you sound like you don’t know what you’re doing if you cock it up. Overall, this piece can be improvised through with some skill, knowledge and perseverance, just don’t expect it to be a breeze.